kind-installations-and-deployments
About kind:
kind is a tool for running local Kubernetes clusters using Docker container “nodes”. kind was primarily designed for testing Kubernetes itself, but may be used for local development or CI.
—————————————————————————————————————————————
—————————————————————————————————————————————
Side Notes – Clarifying Terminologies:
Difference between kind, Kubernetes, kubectl, kubelet, and minikube?
kind:
kind lets you run Kubernetes on your local computer. This tool requires that you have Docker installed and configured.
From: https://kubernetes.io/docs/tasks/tools/
a tool for running local Kubernetes clusters using Docker container “nodes”
kubernetes: a container manger that manages docker containers
kubectl:
The Kubernetes command-line tool, kubectl, allows you to run commands against Kubernetes clusters. You can use kubectl to deploy applications, inspect and manage cluster resources, and view logs.
From https://kubernetes.io/docs/tasks/tools/
kubelet:
It is an agent running on each node, control plane and workers.
It is part of the worker node component.
It interacts with the container runtime on the node to run containers associated with the Pod.
It monitors the health and resources of Pods running containers.
CRI is the connection with container runtime.
The kubelet connects to container runtimes through a plugin based interface - the Container Runtime Interface (CRI). The CRI consists of protocol
buffers, gRPC API, libraries, and additional specifications and tools that are currently under development.
To connect to interchangeable container runtimes, kubelet uses shim application, which provides a clear abstraction layer between kubelet and the
container runtime

As shown above, kubelet acting as grpc client connects to the CRI shim acting as grpc server to perform container and image operations
From: https://www.edx.org/course/introduction-to-kubernetes
Minikube
Just like kind, minikube is another tool that lets you run Kubernetes locally. minikube runs a single-node Kubernetes cluster on your personal computer (including Windows, macOS and Linux PCs) so that you can try out Kubernetes, or for daily development work.
From: https://kubernetes.io/docs/tasks/tools/
—————————————————————————————————————————————
—————————————————————————————————————————————
Install kubectl
Install kubectl with Homebrew on MacOS:
brew install kubectl
Make sure version of installation is up-to-date:
kubectl version --client
Link for the installation: https://kubernetes.io/docs/tasks/tools/install-kubectl-macos/#install-with-homebrew-on-macos
Install kind
After installing kubectl, install kind.
Instal kind with homebrew:
brew install kind
Creating Cluster:
Use kind version to find a complete listing of images created for a kind release.
kind version
Usually there is already a default node image provided.
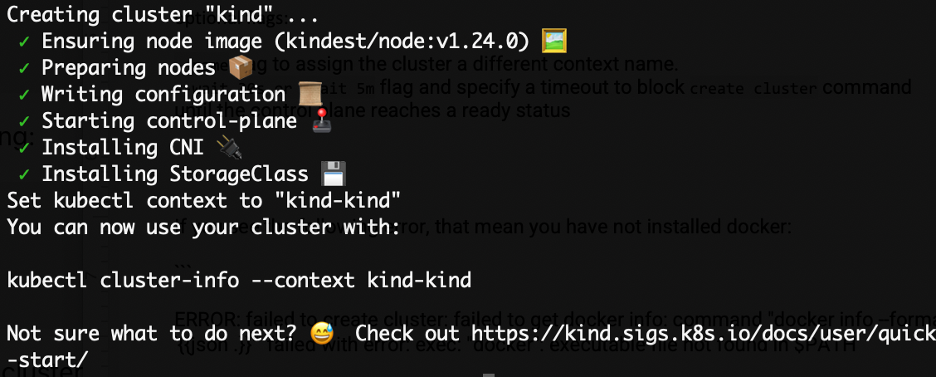
Create a cluster: this will bootstrap a Kubernetes cluster using a pre-built node image,
kind create cluster --config kind-multi-node-clusters-config.yaml --name kind-multi-nodes
optional flags:
–name flag to assign the cluster a different context name.
–wait 30s or –wait 5m flag and specify a timeout to block create cluster command until the control plane reaches a ready status
You should be able to see something like this:
—————————————————————————————————————————————
—————————————————————————————————————————————
Side Notes:
What is a node image?
It is a Docker image for running nested containers, systemd, and Kubernetes components. The image is built on top of a “base” image
(https://kind.sigs.k8s.io/docs/design/base-image)
More information about node image is on https://kind.sigs.k8s.io/docs/design/node-image
Creating Clusters using yaml file
You can configure yaml files to create clusters with different settings.
Multi-node clusters
Build a configure yaml file according to the following:
# three node (two workers) cluster config
kind: Cluster
apiVersion: kind.x-k8s.io/v1alpha4
nodes:
- role: control-plane
- role: worker
- role: worker
This creates one control plane nodes and two worker nodes or data plane nodes.
Run the following command:
kind create cluster --config kind-multi-node-clusters-config.yaml --name kind-2
Note:
- need to use –name
to create cluster with different name from exisitng clusters. If not, the folowing error will occur: $ kind create cluster --config kind-multi-node-clusters-config.yaml ERROR: failed to create cluster: node(s) already exist for a cluster with the name "kind" - capital letter is not allowed in naming the clusters. If not, the folling error will be shown:
ERROR: failed to create cluster: 'kind-HA' is not a valid cluster name, cluster names must match `^[a-z0-9.-]+$`
Control-plane HA
You can also build multiple control planes to form high availiabiilty mode in order to ensure more control-planes are available:
kind: Cluster
apiVersion: kind.x-k8s.io/v1alpha4
nodes:
- role: control-plane
- role: control-plane
- role: control-plane
- role: worker
- role: worker
- role: worker
Execute the following command to create the cluster
kind create cluster --config kind-multi-node-clusters-config.yaml --name kind-ha
Mapping ports to the host machine
kind: Cluster
apiVersion: kind.x-k8s.io/v1alpha4
nodes:
- role: control-plane
  extraPortMappings:
  - containerPort: 80
    hostPort: 80
    listenAddress: "0.0.0.0" # Optional, defaults to "0.0.0.0"
    protocol: udp # Optional, defaults to tcp
Notes: “hostPort” is the port on the local computer that kind is residing on, and “containerPort” is port on the docker container, which encapsulates the microservice. “listenAddress” is the IP address of the interface on the “containerPort”. So “containerPort,” the server in this case, is listening for any request that is sent from “hostPort” on client.
—————————————————————————————————————————————
—————————————————————————————————————————————
If you see the following error, that means you have not installed or opened docker:
ERROR: failed to create cluster: failed to get docker info: command "docker info --format ''" failed with error: exec: "docker": executable file not found in $PATH
If you did not install docker, use the following link to install: https://docs.docker.com/get-docker/
Interacting With Cluster
By default, the cluster access configuration is stored in ${HOME}/.kube/config if $KUBECONFIG environment variable is not set.
Get a list of clusters that you have set up:
$ kind get clusters
kind
you can also check via docker ps command:
$ docker ps
CONTAINER ID   IMAGE                  COMMAND                  CREATED        STATUS          PORTS                       NAMES
b6fafca5fe17   kindest/node:v1.24.0   "/usr/local/bin/entr…"   15 hours ago   Up 31 minutes   127.0.0.1:59161->6443/tcp   kind-control-plane
Another way to confirm it is through kubectl get nodes
$ kubectl get nodes
NAME                 STATUS   ROLES           AGE   VERSION
kind-control-plane   Ready    control-plane   15h   v1.24.0
delete a cluster:
kind delete cluster
Get information about your cluster using this template:
kubectl cluster-info --context kind-<cluster name, eg: kind> <br>
You should be able to see the following result:
$ kubectl cluster-info --context kind-kind
Kubernetes control plane is running at https://127.0.0.1:59161
CoreDNS is running at https://127.0.0.1:59161/api/v1/namespaces/kube-system/services/kube-dns:dns/proxy
To further debug and diagnose cluster problems, use ‘kubectl cluster-info dump’.
Building and loading an Image Into Your Cluster
Now we can try to build an image that contains a microservice appliaction.
We are borrowing the instructions from: https://docs.docker.com/get-started/02_our_app/
Building an image for simple todo list manager application:
- Write Dockerfile under the app folder
- Build container image for the application, this will execute the Dockerfile in the current directory that your terminal is in. See the side notes for Dockerfile:
docker build -t getting-started:version1 .Build an image using docker using the format: “docker build -t
: ”
--tag , -t: Name and optionally a tag in the 'name:tag' format
A image tag typically writes the version number.
---------------------------------------------------------------------------------------------------------------------------------------
---------------------------------------------------------------------------------------------------------------------------------------Side Notes for Dockerfile:
Typically an docker container image will look like as such, which is contained in a file named “Dockerfile”:
# syntax=docker/dockerfile:1
# instructed the builder that we wanted to start from the node:12-alpine image
# since we didn’t have that on our machine, that image needed to be downloaded
# FROM the family node version 12, download the alphin operating system. "node" is a repository in docker,
# and within that repository, there is alphone. Download a copy of the bare image, using that as your containger system.
FROM node:12-alpine
# RUN: inside the container image you have downloaded, run this command "apd add --no-cache python2 g++ make", which means,
# using the command line package manager, apk, with no cache ir don't refresh the cache with package manager,
# to install the programs: python2, g++, and make
RUN apk add --no-cache python2 g++ make
# change to directory app/
# copy from files from root to current directory
WORKDIR /app
COPY . .
# After the image was downloaded,
# we copied in our application and used yarn to install our application’s dependencies.
RUN yarn install --production
# The CMD directive specifies the default command to run when starting a container from this image.
CMD ["node", "src/index.js"]
EXPOSE 3000
To delete an image, execute:
docker image rm -f getting-started
—————————————————————————————————————————————
—————————————————————————————————————————————
- Create a container on top of the image and run the microservice inside the container:
docker run -dp 3000:3000 todolistapp:version1go to http://localhost:3000 to see the webpage
- Check whether a new container is being build
$ docker container ls CONTAINER ID IMAGE COMMAND CREATED STATUS PORTS NAMES 409ba3c38297 todolistapp:version1 "docker-entrypoint.s…" 5 minutes ago Up 5 minutes 0.0.0.0:3000->3000/tcp stoic_hoover - Enter into the docker container and see the content. Using either container name or container ID will work:
$ docker exec -it stoic_hoover sh$ docker exec -it 409ba3c38297 sh - Load the docker image with its unique-tag into your cluster node:
kind load docker-image getting-started:version1 --name=kind-multi-nodes—————————————————————————————————————————————
—————————————————————————————————————————————Side Notes:
What is a manifest?
It is a file that defines configuration within containerization, a yaml file is a manifest
A manifest specifies the desired state of an object that Kubernetes will maintain when you apply the manifest. Each configuration file can contain
multiple manifests.It can be in json or yaml format. From: https://stackoverflow.com/questions/55130795/what-is-a-kubernetes-manifest#:~:text=A%20manifest%20specifies%20the%20desired,file%20can%20contain%20multiple%20manifests.
kubernetes is consistent:
meaning you give is a manifest for docker file, docker file is the manifest, you say please execute this manifest from this docker file. This docker file makes a bunch of actions and make it happen
What’s the relationship between kind and minikube?
There is not really a relationship between the two. kind and minikube are both software that are written to start kubernetes cluster. They are local cluster management tools, meaning they are tools for you to install kubernetes on your laptop. They are bootstrapping tools for running kubernetes clusters in your laptops.
Building a cluster is very hard and difficult.
This link (https://github.com/kelseyhightower/kubernetes-the-hard-way) contains all the information about building these clusters manually way back then. When creating a cluster, it is dealing with hundreds of steps.
How does the minikube node link with kind cluster?
There is no relationship between kind and minikube
Problem: when minikube installs kubectl, so kubectl only shows nodes from minikube instead of kind
You can switch between clusters. You can control your clusters.
Here are the procedure to switch contexts:
- Get all existing contexts
$ kubectl config get-contexts
CURRENT   NAME                            CLUSTER                         AUTHINFO                        NAMESPACE
       kind-kind                       kind-kind                       kind-kind
       kind-kind-2                     kind-kind-2                     kind-kind-2
       kind-kind-extra-port-mappings   kind-kind-extra-port-mappings   kind-kind-extra-port-mappings
       kind-kind-ha                    kind-kind-ha                    kind-kind-ha
       kind-kind-multi-nodes           kind-kind-multi-nodes           kind-kind-multi-nodes
*         kind-kind-v1-cluster            kind-kind-v1-cluster            kind-kind-v1-cluster
       minikube                        minikube                        minikube                        default
The CURRENT column shows which row is the kubectl controlling.
You can also use “kubectl config view” to show all contexts and clusters.
- Switch between contexts
kubectl config use-context CONTEXT_NAMEThe CONTEXT_NAME will be the name column shown by get all existing contexts. They are basically switching the address that are pointing to the clusters. From: https://stackoverflow.com/questions/43643463/how-to-switch-kubectl-clusters-between-gcloud-and-minikube
How to inspect the content of a kind cluster, such as images that have been loaded?
Use kubectl to do it:
- Get all the nodes of existing clusters using “ kubectl get nodes”
- Get into each node with docker exec -ti
bash - Run crictl images to see images loaded on that node.
From: https://stackoverflow.com/questions/60487792/kind-cluster-how-to-see-docker-images-that-are-loaded
Does control plane nodes have kube-proxy and kubelet too ?
• No, they don’t
quorum:
quorum refers to the majority of the nodes. When you lose a node, the other two servers will maintain quorum, and they have enough data to remain functioning. Kubenetes will spin up a missing node to replace the missing one. Promote the replacement node to a leader, and all three nodes will become the leader and disseminate the load to everyone.
From: https://netapp-trident.readthedocs.io/en/stable-v19.01/dag/kubernetes/kubernetes_cluster_architecture_considerations.html
How can manifest include certain image and create a cluster?
Manifest is a dockerfile, and to specify a image, add the image after the word “FROM”:
# syntax=docker/dockerfile:1
FROM node:12-alpine
RUN apk add --no-cache python2 g++ make
WORKDIR /app
COPY . .
RUN yarn install --production
CMD ["node", "src/index.js"]
EXPOSE 3000
Is this true: Container is the subset of pod, which is the subset of namespaces?
Yes, this is true.
Does api version matter?
So API version refers to which version of kind api you are using, not the software or container. It is an API in kind that is being used to v1alpha4 implementation.
# three node (two workers) cluster config
kind: Cluster
apiVersion: kind.x-k8s.io/v1alpha4
nodes:
- role: control-plane
- role: worker
- role: worker
“kubectl api-versions” is referring to the api for specific containers and nodes, which are within the kubernetes clusters:
—————————————————————————————————————————————
—————————————————————————————————————————————